In this tutorial I’ll show you how to create a dark abstract photo manipulation with crows and disintegration effect. You’ll learn how to create this interesting effect in an easy way, add abstract elements, create depth of field and more.
What you’ll be creating
We’ll start this tutorial by creating a black and white background, then adding model and doing some retouch on her. We’ll also create disintegration effect for the hair with the help of debris brushes. Then we’ll add other elements, such as feathers, watercolor brushes, crow and more debris. Finally we’ll add and draw some abstract decoration for model to complete this tutorial. You’ll need Photoshop CS3 or newer to follow the process.
Tutorial Resources
Step 1
Create a new document with size of 3307×2480 px and fill it with white. Press Cmd/Ctrl+Shift+N to make a new layer. Hit G to active Gradient Tool and choose Radial Gradient with color #d5d5d5 and white (#ffffff). Drag a line from the left to right:
Step 2
Go to Layer-New Adjustment Layer-Curves and decrease the lightness:
Press B to active Brush Tool and vary brush opacity from 20 to 100%. Choose Curves layer mask and paint to reduce the dark on the parts shown on screenshot below:


Step 3
Extract model and place her at the left of our main canvas:
Step 4
Click the second button at the bottom of Layer Pallete to add mask to model layer. First I used soft black brush to remove hard edges of the hair, shoulder, neck (don’t paint too much, just enough to make the edges softer). Then I painted with debris brushes on these masked edges to create a disintegration effect there. With debris brushes, I changed settings for them (press F5 to do it) as shown below:
You can choose different brushes to paint.. Here is result on my layer mask and result on picture:

Step 5
Open model stock again. Use Lasso Tool (L) to copy the hair part then put it behind the model on our main picture. Use Warp Tool (Edit-Transform-Warp) to bend this hair a little:
Add layer mask to this one with debris brushes:

Step 6
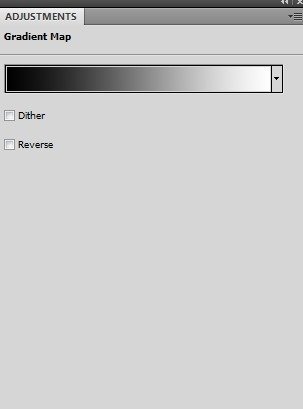
Make model and hair layers selected then press Cmd/Ctrl+G to make group for them. Change the mode of this group from Pass Through (default group mode) to Normal 100%. On hair layer, go to Layer-New Adjustment Layer-Gradient Map and pick default colors (black and white) to desaturate the model:

Step 7
To increase the contrast of the model I used a Curves layer:
On Curves layer mask use soft black brush to erase on model cheek and nose to reduce the constrast of the skin there:


Step 8
Make a new layer on the top. Active Pen Tool with Shape Layers option (not Path) and draw a shape over the eye part of the model with black. Change the mode to Overlay 100% :
Add layer mask to this one and remove the part outside the model:

Step 9
Create a new layer, use hard brush with color #ff0000 to paint on front part of model lips, then alter the mode to Overlay 100%.
Step 10
Create a new layer and change foreground to black. Choose abstract circle brushes (I took the first one) and paint on model forehead. Use Warp Tool to tweak this circle as show below:
I applied brush masking for the result below:

Step 11
Make a new layer under model group and change brush to feather ones. Choose brush with number 584 to paint behind model neck and rotate it with Cmd/Ctrl+T:
Duplicate this layer and flip it horizontally (Edit-Transform-Flip Horizontal). Move it to the right of the neck, then group two these layers. I named it “feathers 1”.

Step 12
Create three new layers above model group and add more feathers to front of model neck.
Step 13
Create several layers and use different feathers to add around model. Remember to vary brush sizes and angles to get more random, natural result:
Step 14
In this step I added four feathers to foreground and top left of the pic. With each layer, choose filter-Blur-Gassian Blur and pick radius as 8.5 px:
Make group for all feathers from step 12 to step 14. Call it “feathers 2”.
This step is to create some depth for the picture.
Step 15
Create a new layer on the top. Change foreground to #1d1b1b and active abstract spiral brushes. Choose brush with number 1176 and paint on the neck part with feathers:
Add layer mask to this one and blur some unwanted lines with soft brush:

Step 16
Make two layers on the top, change foreground to black. On each layer use watercolor brushes (pick the ones you like) to paint under the neck with feathers.
Use cmd/Ctrl+T to rotate it to get your desired result., and layer mask to remove any unwanted parts:

Step 17
Open crow 1 stock. Isolate him and put him beside model ear:
Add layer mask to crow 1 layer and use soft brush with opacity about 50-55% to blend the lower part of the crow with model head:

Step 18
On the crow 1 layer, go to Layer-New Adjustment Layer-Gradient Map and check Clipping Mask options:
Pick default colors (black and white) for Gradient Map to desaturate this crow:

Step 19
I used Curves with Clipping Mask to darken this crow:
Step 20
Add crow 2 after extracting to the disintegrated hair part of the model:
Use derbis brushes with same setting in step 4 to blend the crow with this disintergration.

Step 21
Use a Gradient Map layer with black and white for this crow :
Step 22
Put crow 3 at the right of the pic, between flying feathers:
I used Curves to lower the contrast of the crow:

Step 23
I added a Hue/Saturation layer to desaturate this crow:
Step 24
Make some layers on the top. Use black and debris brushes to add to disintegrated hair. Play with transform tools and different brushes until you feel good. Don’t hesitate to use layer mask if needed to get a better result. Here is mine:
Step 25
Make group for debris layers as done with model and hair. Use Curves above all these ones to decrease the contrast of them a little:

Step 26
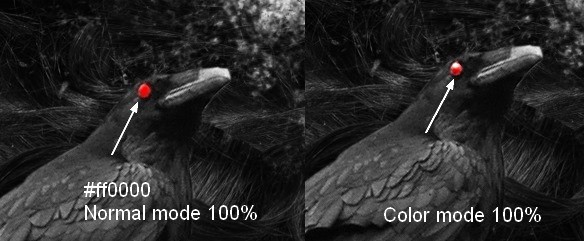
Create a layer on the top. Use a red color for brush (I picked #ff0000) to paint on the eye of the crow beside model ear to make an evil effect. Change the mode to Color 100%:
Step 27
We’ll add some decoration to model eye. Make a new layer and pick black for basic brush with 2 px. Press F5 to change settings of this brush to Pen Pressure:
Use this brush to paint small lines around model eye and on crow 1. This does not need to be so precise and neat:

Step 28
On a new layer use same brush with with red color (#ff0000) to paint another lines between black ones:
Step 29
Add spiral brush (number 1176) to model eye with smaller size. I used layer mask to remove unwanted lines:
Step 30
Final step: I used a Hue/Saturation layer to increase the vibrance of the red effect:

Final Results
![crow30-final[1] crow30-final[1]](https://i1.wp.com/www.photoshoptutorials.ws/wp-content/uploads/2014/04/crow30-final1.jpg?resize=700%2C525)


.jpg)

0 Comments